Make an Injection Pipeline
Making a Fully Qualified Source Injection Pipeline
In the source_injection package, one of the first things a user can do is to construct their own pipeline YAML file.
This file takes a reference pipeline YAML (for example, the HSC DRP-RC2 pipeline definition YAML) and merges in a source injection task of your choice.
We refer to this “merged” pipeline as a “fully qualified” pipeline definition YAML.
Complete source injection pipeline definition YAML files are dynamically generated prior to use. This allows the user to specify source injection configuration parameters in a simple human-readable format and provides flexibility as to which dataset type synthetic sources are to be injected into.
Fully qualified pipelines are generated by combining a source injection pipeline definition stub with a pipeline reference file. The pipeline reference file is a complete pipeline definition YAML file that is used as a reference for a fully qualified source injection pipeline. Typically, a pipeline reference file will be a pipeline that is being used to reduce data as part of a data reduction campaign.
Either the make_injection_pipeline command line script or the associated make_injection_pipeline() Python function may be used to generate a fully qualified injection pipeline.
Examples on this page illustrate the use of both methods.
Injection Pipeline Stubs
A number of different source injection pipeline stubs have been constructed in the $SOURCE_INJECTION_DIR/pipelines directory.
Each of these pipeline stubs contain a single task that is used to inject sources into a particular dataset type.
Although these injection pipeline YAML stubs can be used directly, it is recommended that the make_injection_pipeline command line script or the associated make_injection_pipeline() Python function be used to generate a complete source injection pipeline definition YAML file for subsequent use.
A complete injection pipeline definition file will contain the pipeline stub as a subtask alongside any additional tasks required to complete the source injection process.
Tasks from the reference pipeline may either be removed or have specific configuration overrides applied as necessary to support subsequent injected source image data reduction.
Note
When using the above utilities to construct a fully qualified injection pipeline, any subsets will also be updated to include the injection task where appropriate.
For example, if the inject_exposure.yaml pipeline stub is used to inject sources into a postISRCCD dataset type, the step1 subset of the reference pipeline will be updated to also include the inject_exposure task.
This behavior can be disabled by passing the -e argument on the command line, or setting exclude_subsets to True in Python.
The table below lists the available pipeline YAML stubs inside the $SOURCE_INJECTION_DIR/pipelines directory and the dataset types they are designed to inject sources into:
Injection Dataset Type |
|
|
|
|---|---|---|---|
Injection Pipeline Stub |
|||
Injection Task |
|||
Injection Task Graph |
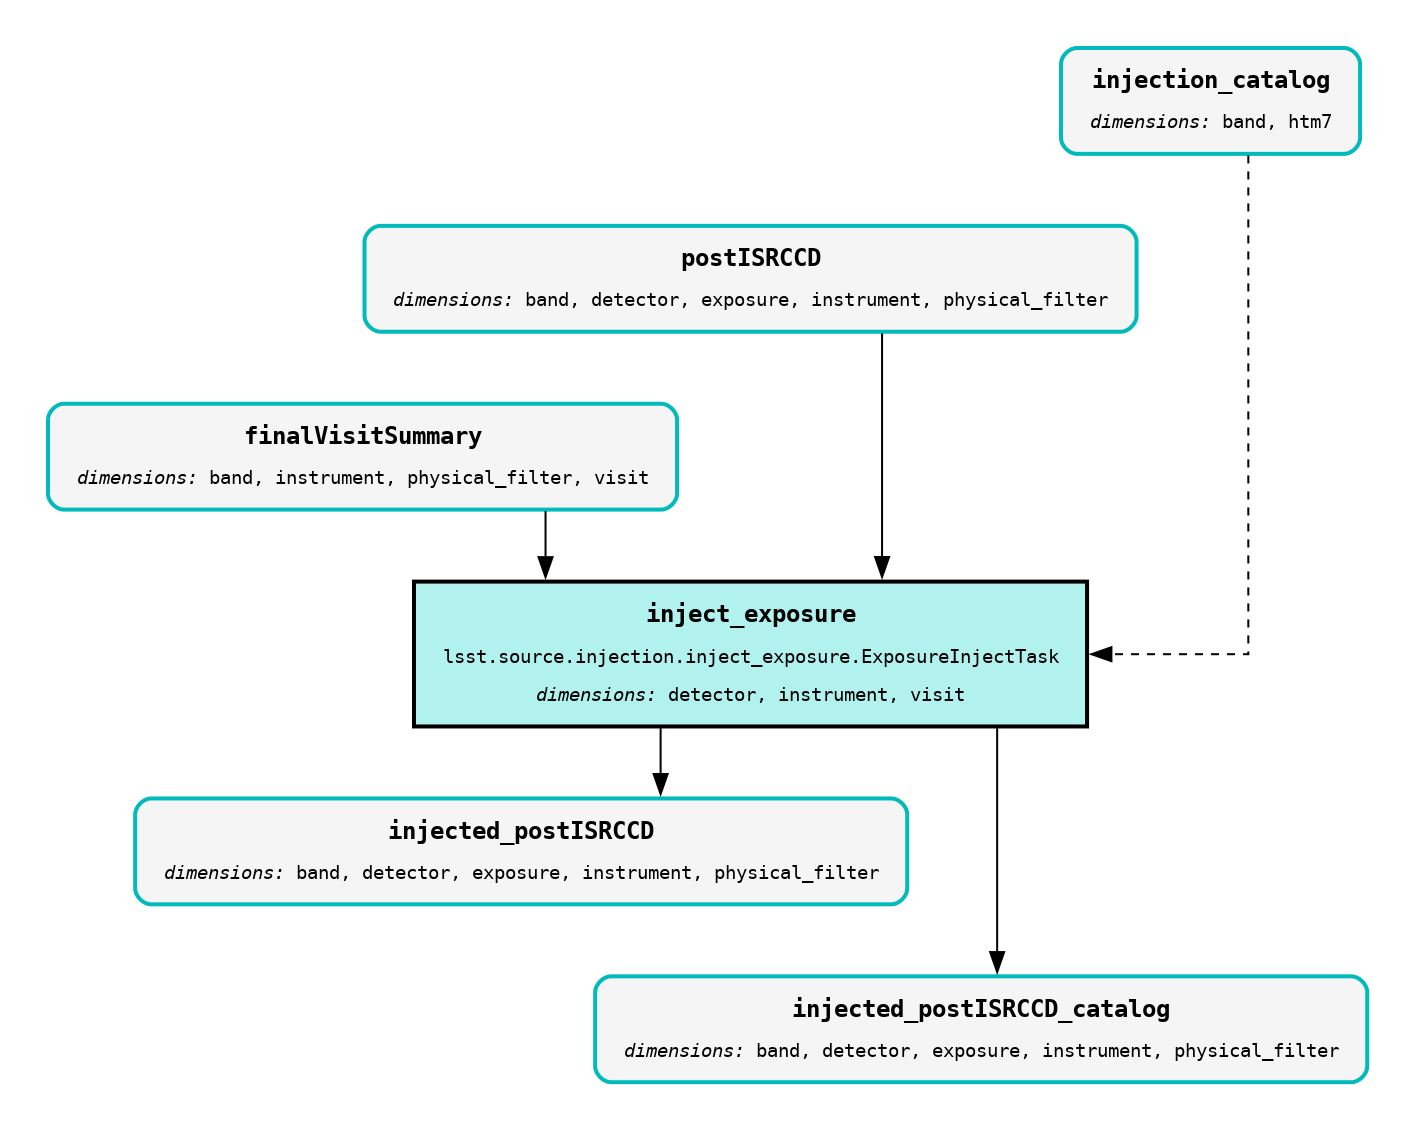
|
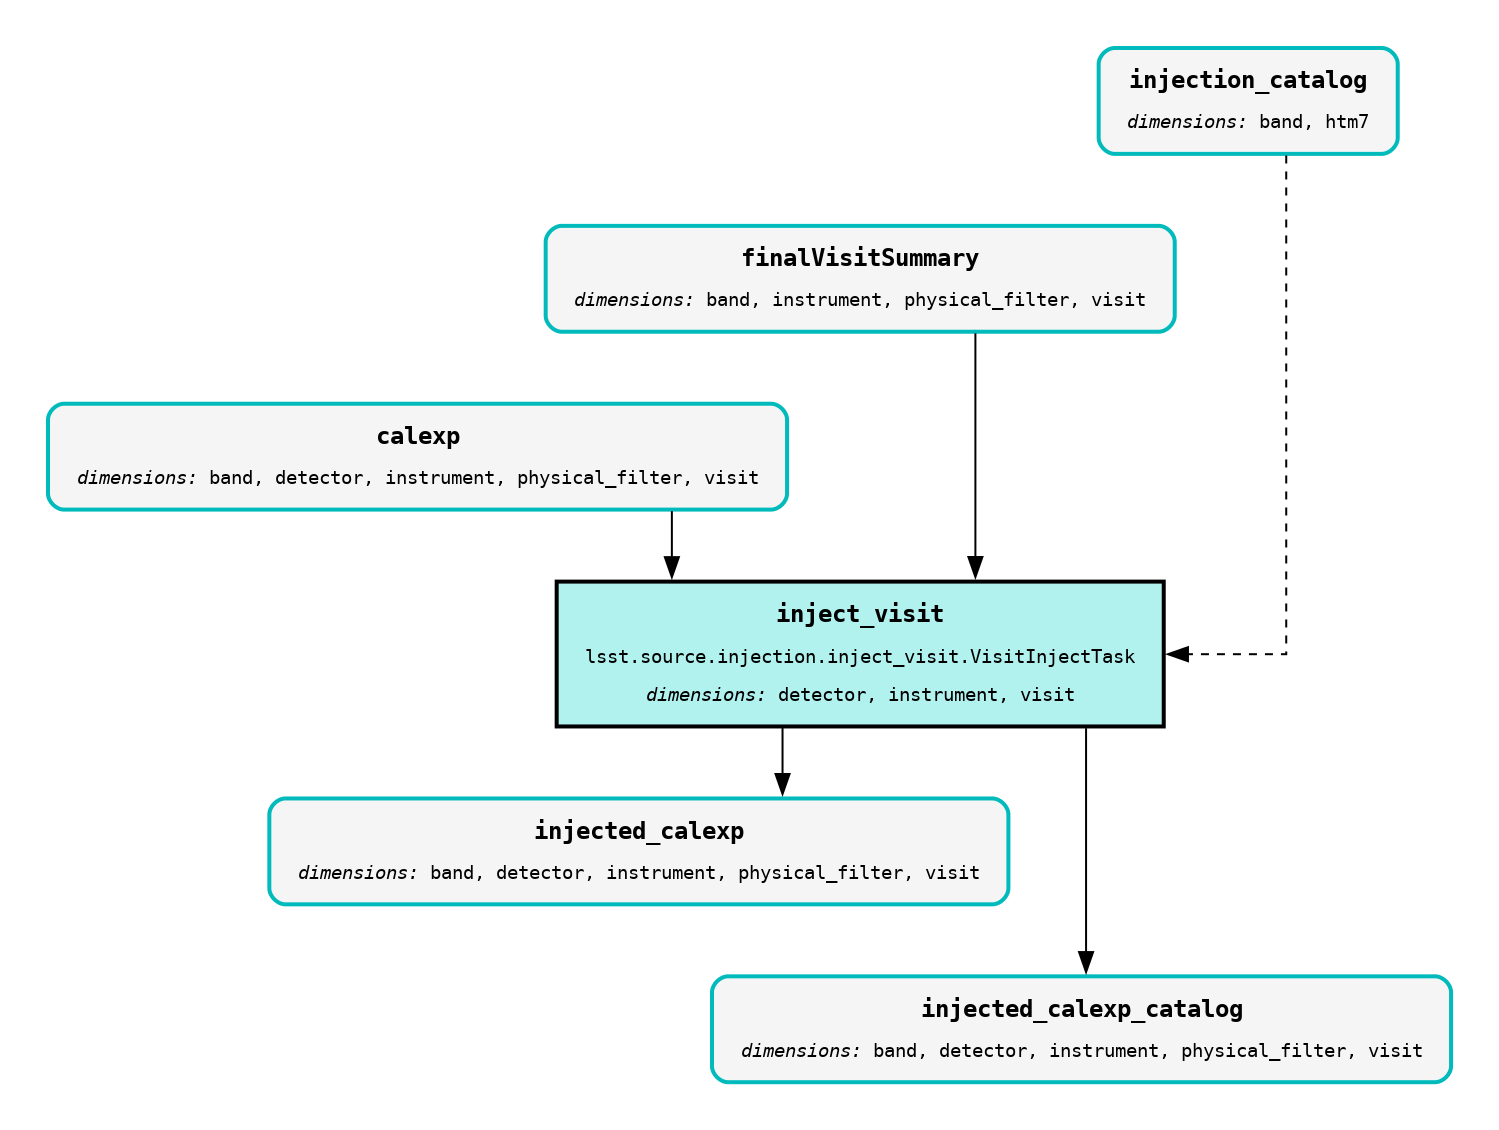
|
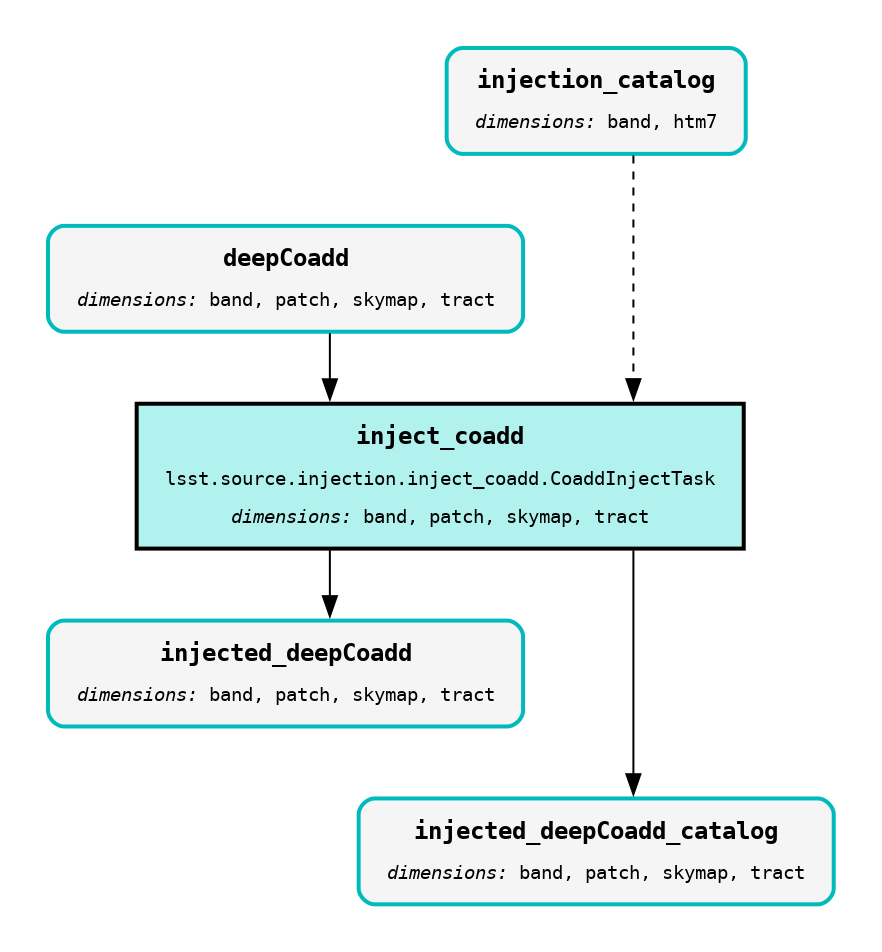
|
A source injection pipeline stub may always be specified directly, however, both the make_injection_pipeline command line script and the make_injection_pipeline() Python function will attempt to infer the correct pipeline stub to use based on the injected dataset type specified.
This inference is based on a match of the injected dataset type to a predefined list of common types and their associated pipeline stubs.
Make an Injection Pipeline on the Command Line
The make_injection_pipeline command line script is used to generate a complete source injection pipeline definition YAML file.
More information on the operation of this script may be obtained by running make_injection_pipeline --help.
As an example on the command line, to create a pipeline YAML which will inject a synthetic source into a postISRCCD exposure-type dataset type using the HSC DRP-RC2 pipeline as a reference:
make_injection_pipeline \
-t postISRCCD \
-r $DRP_PIPE_DIR/pipelines/HSC/DRP-RC2.yaml \
-f DRP-RC2+injection.yaml
where
$DRP_PIPE_DIRThe path to the
drp_pipepackage directory.
The above command will save a complete and fully expanded pipeline definition file into the file DRP-RC2+injection.yaml.
In this example, synthetic sources are to be injected into the postISRCCD dataset type, using the HSC/DRP-RC2.yaml pipeline definition file as a reference.
As the postISRCCD dataset type has dimensions of exposure, the inject_exposure.yaml source injection pipeline definition file stub has been automatically inferred.
That particular injection pipeline YAML stub contains the ExposureInjectTask task.
Tip
To print the fully qualified output pipeline to the terminal window instead of saving it to a file, omit the -f option in the above example.
To specify an injection pipeline definition file stub explicitly rather than allowing the function to attempt to infer it from the injected dataset type, the -i option may be appended to the above command:
...
-i $SOURCE_INJECTION_DIR/pipelines/inject_exposure.yaml
where
$SOURCE_INJECTION_DIRThe path to the source injection package directory.
Make an Injection Pipeline in Python
The make_injection_pipeline() Python function is used to generate a complete source injection pipeline definition YAML file in Python:
from lsst.source.injection import make_injection_pipeline
More information on the operation of this function may be obtained by calling make_injection_pipeline? in a Python interpreter.
As an example in Python, to create a pipeline which will inject a synthetic source into a postISRCCD exposure-type dataset type using the HSC DRP-RC2 pipeline as a reference:
# Construct the Pipeline object.
pipeline = make_injection_pipeline(
    dataset_type_name="postISRCCD",
    reference_pipeline="$DRP_PIPE_DIR/pipelines/HSC/DRP-RC2.yaml",
)

# Print the pipeline.
print(pipeline)
To specify an injection pipeline definition file stub explicitly rather than attempting to infer it from the injected dataset type, the injection_pipeline argument may also be used, e.g.:
pipeline = make_injection_pipeline(
    ...
    injection_pipeline="$SOURCE_INJECTION_DIR/pipelines/inject_exposure.yaml",
)
Once a pipeline object has been constructed, it may be written to disk using the write_to_uri method:
pipeline.write_to_uri("DRP-RC2+injection.yaml")
Visualize an Injection Pipeline
Any pipeline YAML, including an injection pipeline, can be visualized to clarify exactly what the pipeline does.
In this section we provide instructions for visualizing the DRP-RC2+injection.yaml pipeline generated in the above examples.
Options for text-based outputs on the command line and rich rendered outputs are presented.
The tasks and dataset types printed below are accurate as of w_2023_39 of the LSST Science Pipelines.
Tip
Only the step1 subset of the fully qualified injection pipeline is selected in the snippets below by appending the # symbol followed by the label name to the YAML pipeline filename.
Any subset or task within a pipeline YAML can be selected in this way.
Visualize pipeline tasks
The snippet below will generate a text-based representation of only the tasks in the step1 subset of the pipeline.
pipetask build \
-p DRP-RC2+injection.yaml#step1 \
--show task-graph
returning:
■  isr
│
■  inject_exposure
│
■  characterizeImage
│
■  calibrate
│
■  writePreSourceTable
│
■  transformPreSourceTable
Visualize pipeline tasks and datasets
The snippet below will generate a text-based representation of both the tasks and the input/output dataset types in the step1 subset of the pipeline.
pipetask build \
-p DRP-RC2+injection.yaml#step1 \
--show pipeline-graph
returning:
  ◍  yBackground, transmission_sensor, transmission_optics, transmissio...[1]
  │
  ■  isr
  │
  ○  postISRCCD
  │
◍ │  injection_catalog, finalVisitSummary
╰─┤
  ■  inject_exposure
╭─┤
○ │  injected_postISRCCD_catalog
  │
  ○  injected_postISRCCD
  │
  ■  characterizeImage
  │
  ◍  injected_icSrc, injected_icExpBackground, injected_icExp
  │
○ │  ps1_pv3_3pi_20170110
╰─┤
  ■  calibrate
╭─┤
◍ │  injected_srcMatchFull, injected_srcMatch, injected_calexpBackgroun...[2]
  │
  ○  injected_src
  │
  ■  writePreSourceTable
  │
  ○  injected_preSource
  │
  ■  transformPreSourceTable
  │
  ○  injected_preSourceTable
[1]
  yBackground, transmission_sensor, transmission_optics, transmission_filter,
  transmission_atmosphere, raw, linearizer, isrOverscanCorrected, fringe,
  flat, defects, dark, crosstalk, camera, brighterFatterKernel, bias, bfKernel
[2]
  injected_srcMatchFull, injected_srcMatch, injected_calexpBackground,
  injected_calexp
Render a pipeline in graphical format
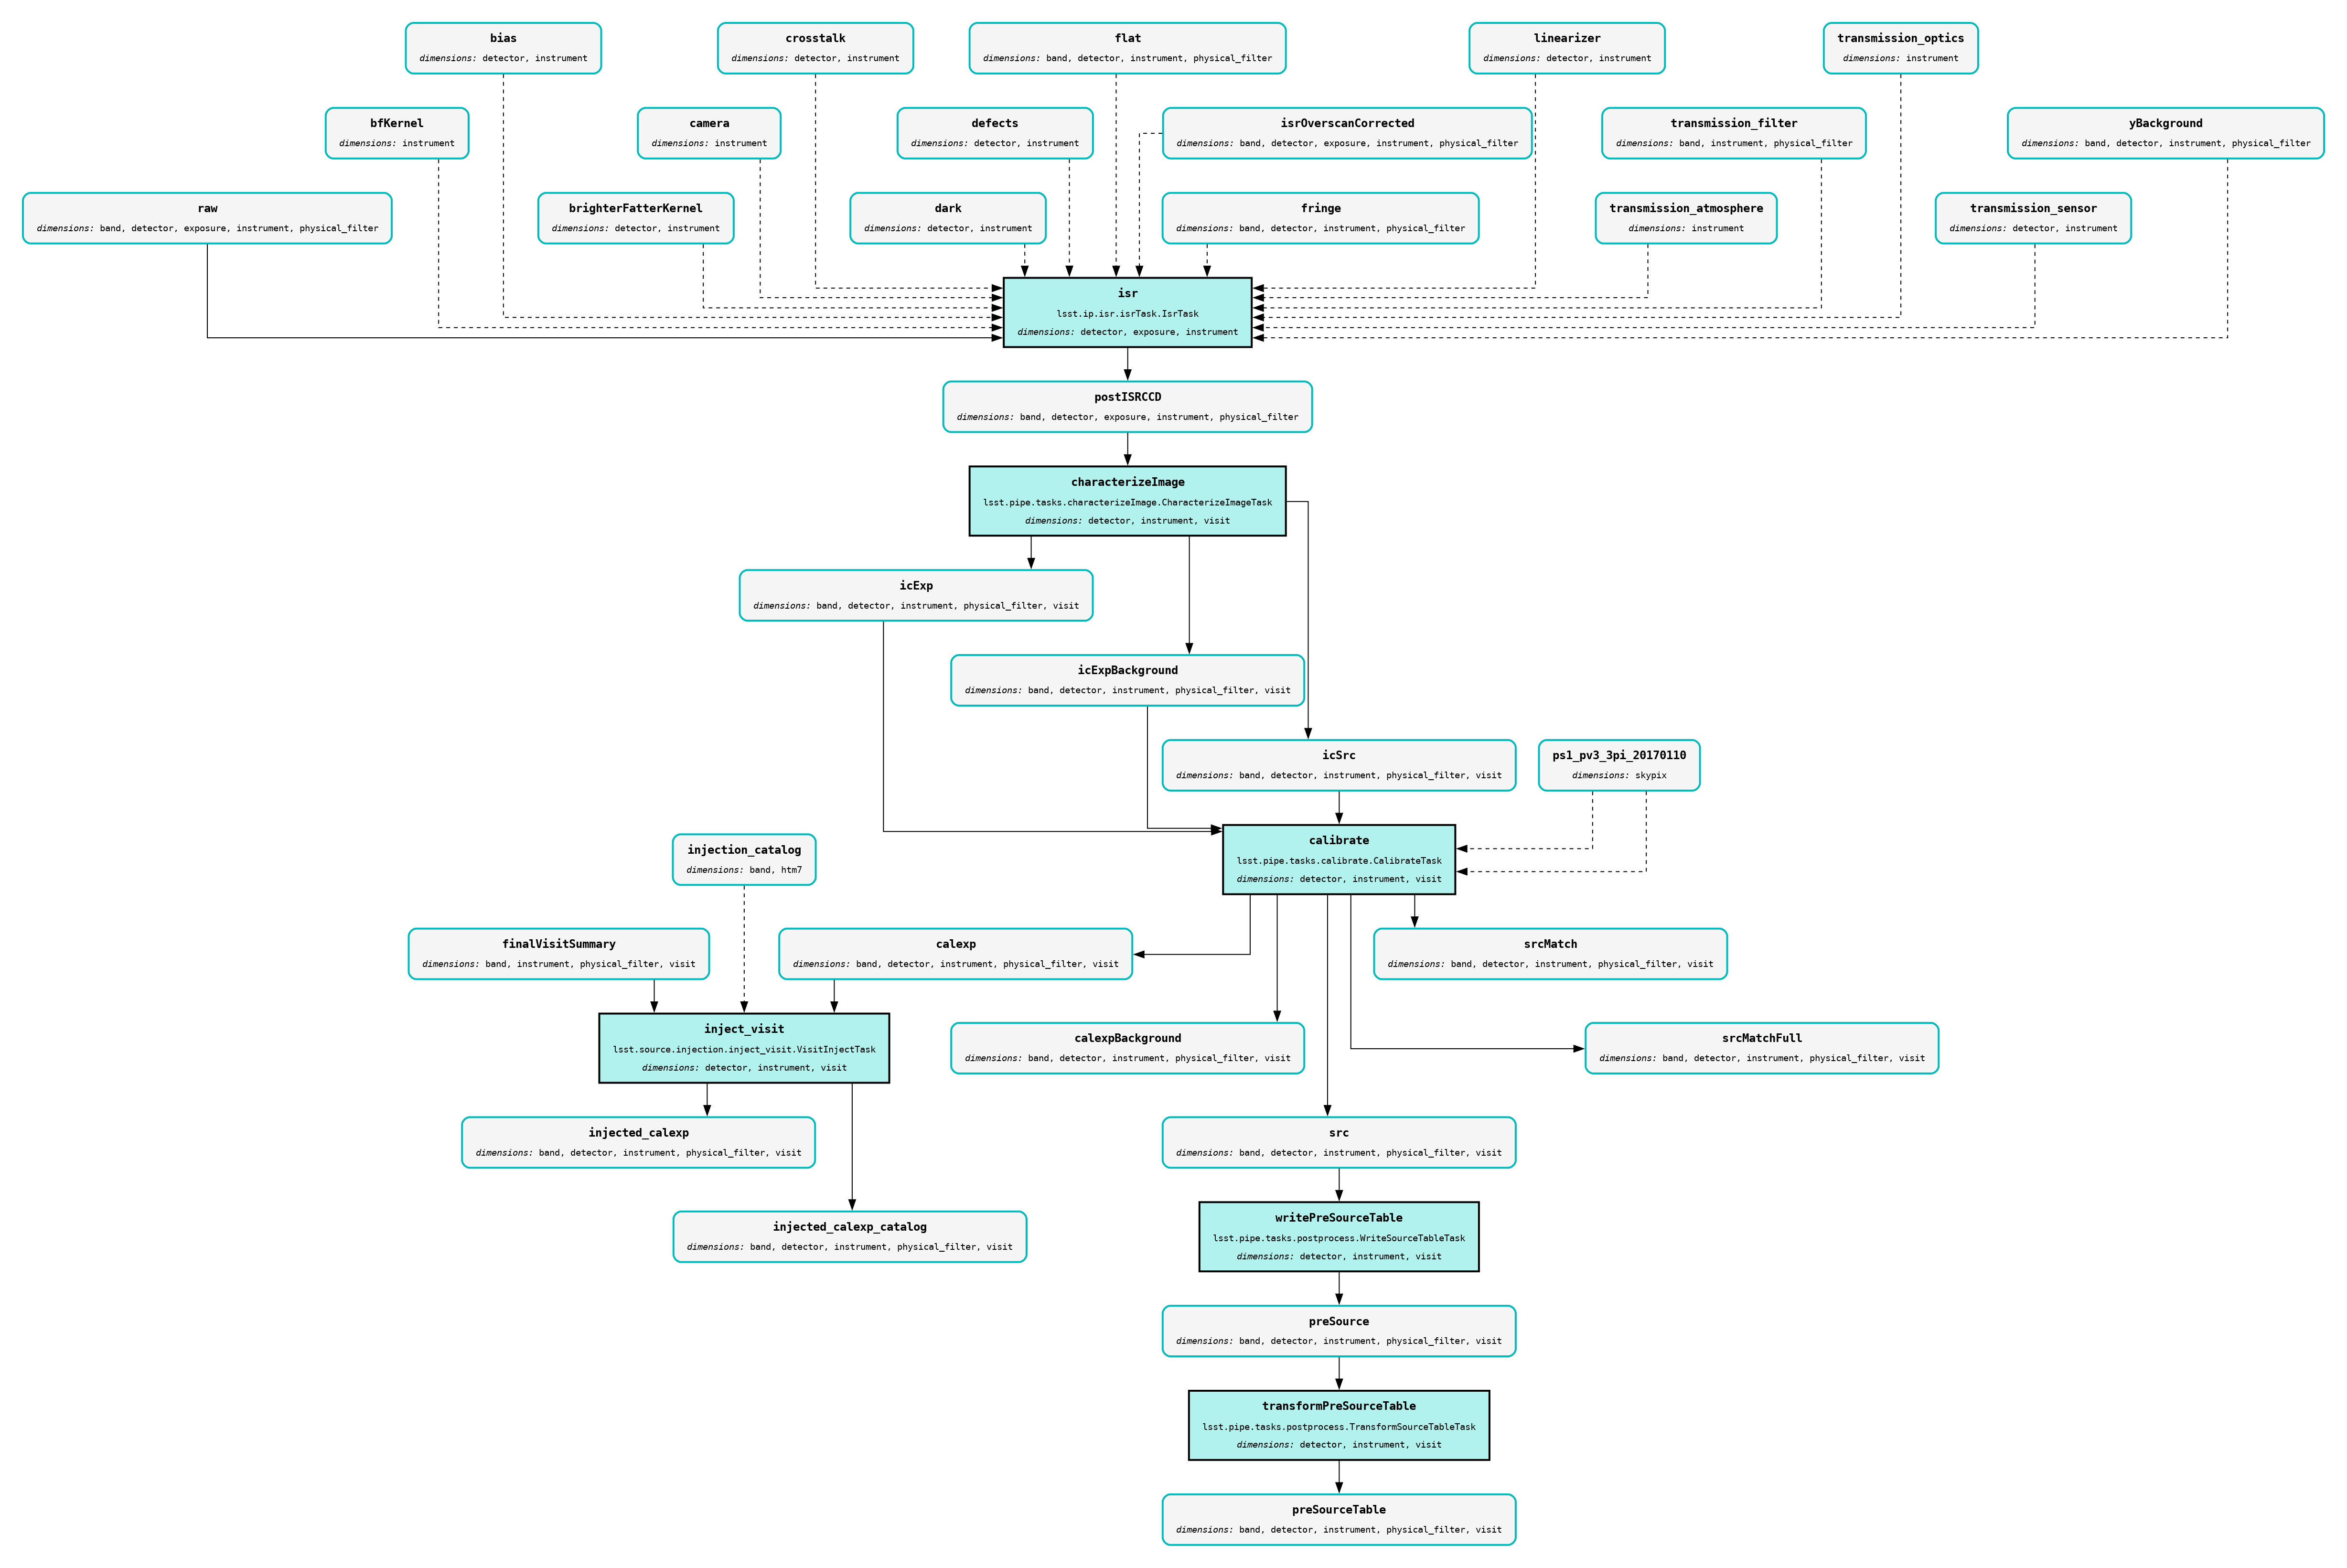
The pipetask build command can also output a pipeline in the GraphViz DOT graph description language format.
This format can be rendered into multiple visual formats such as PDF or PNG types using the dot command line tool.
The snippet below converts the step1 subset of the pipeline produced in the above example into a PNG file.
To help improve the layout of the graph, the unflatten preprocessing filter is also used.
INPUT_PIPELINE=DRP-RC2+injection.yaml#step1
OUTPUT_FILE=DRP-RC2_step1_with_injected_postISRCCD.png
OUTPUT_EXT=${OUTPUT_FILE##*.}  # Resolves to: pdf/svg/png/jpg/...

# Create the directed graph from an input pipeline.
pipetask build -p $INPUT_PIPELINE --pipeline-dot graph_pre.dot

# Post-process the directed graph to improve layout.
unflatten -l 3 -f -o graph_post.dot graph_pre.dot

# Draw the directed graph.
dot graph_post.dot -T$OUTPUT_EXT > $OUTPUT_FILE
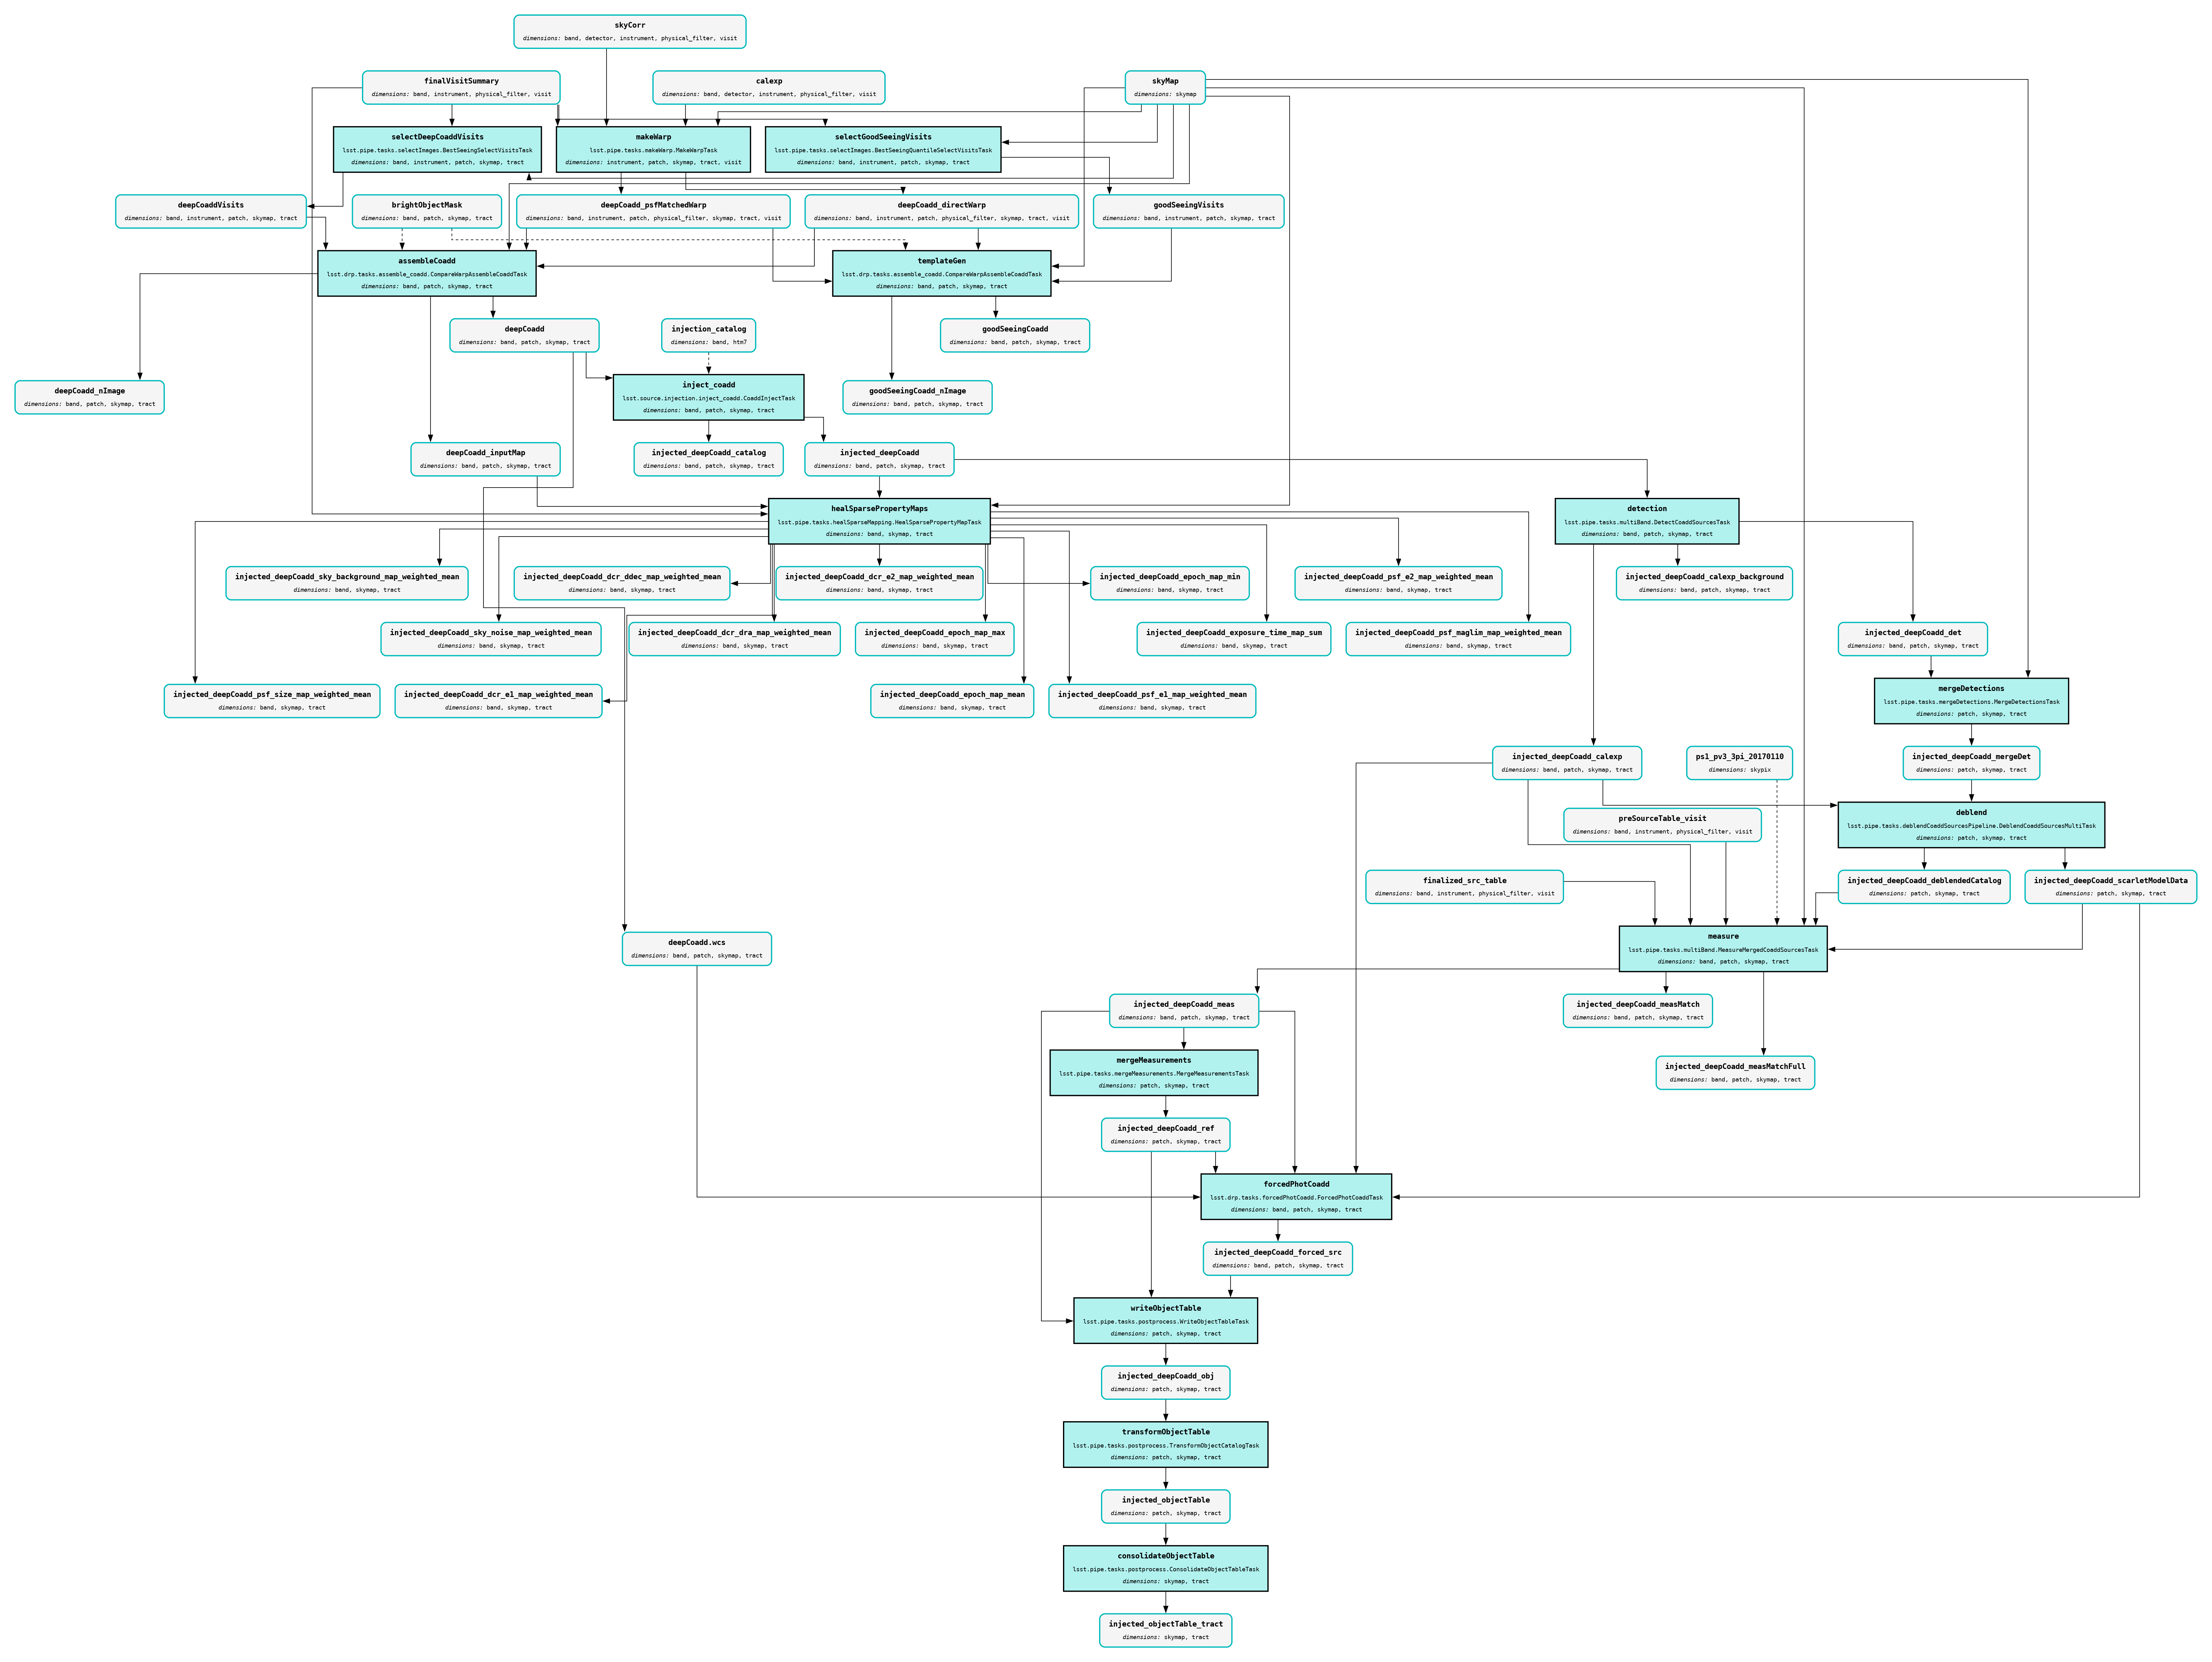
The output PNG from the above example injection into a postISRCCD type is shown below (left panel).
Equivalent graphs for injections into calexp (central panel) and deepCoadd (right panel) types are also shown, for reference.
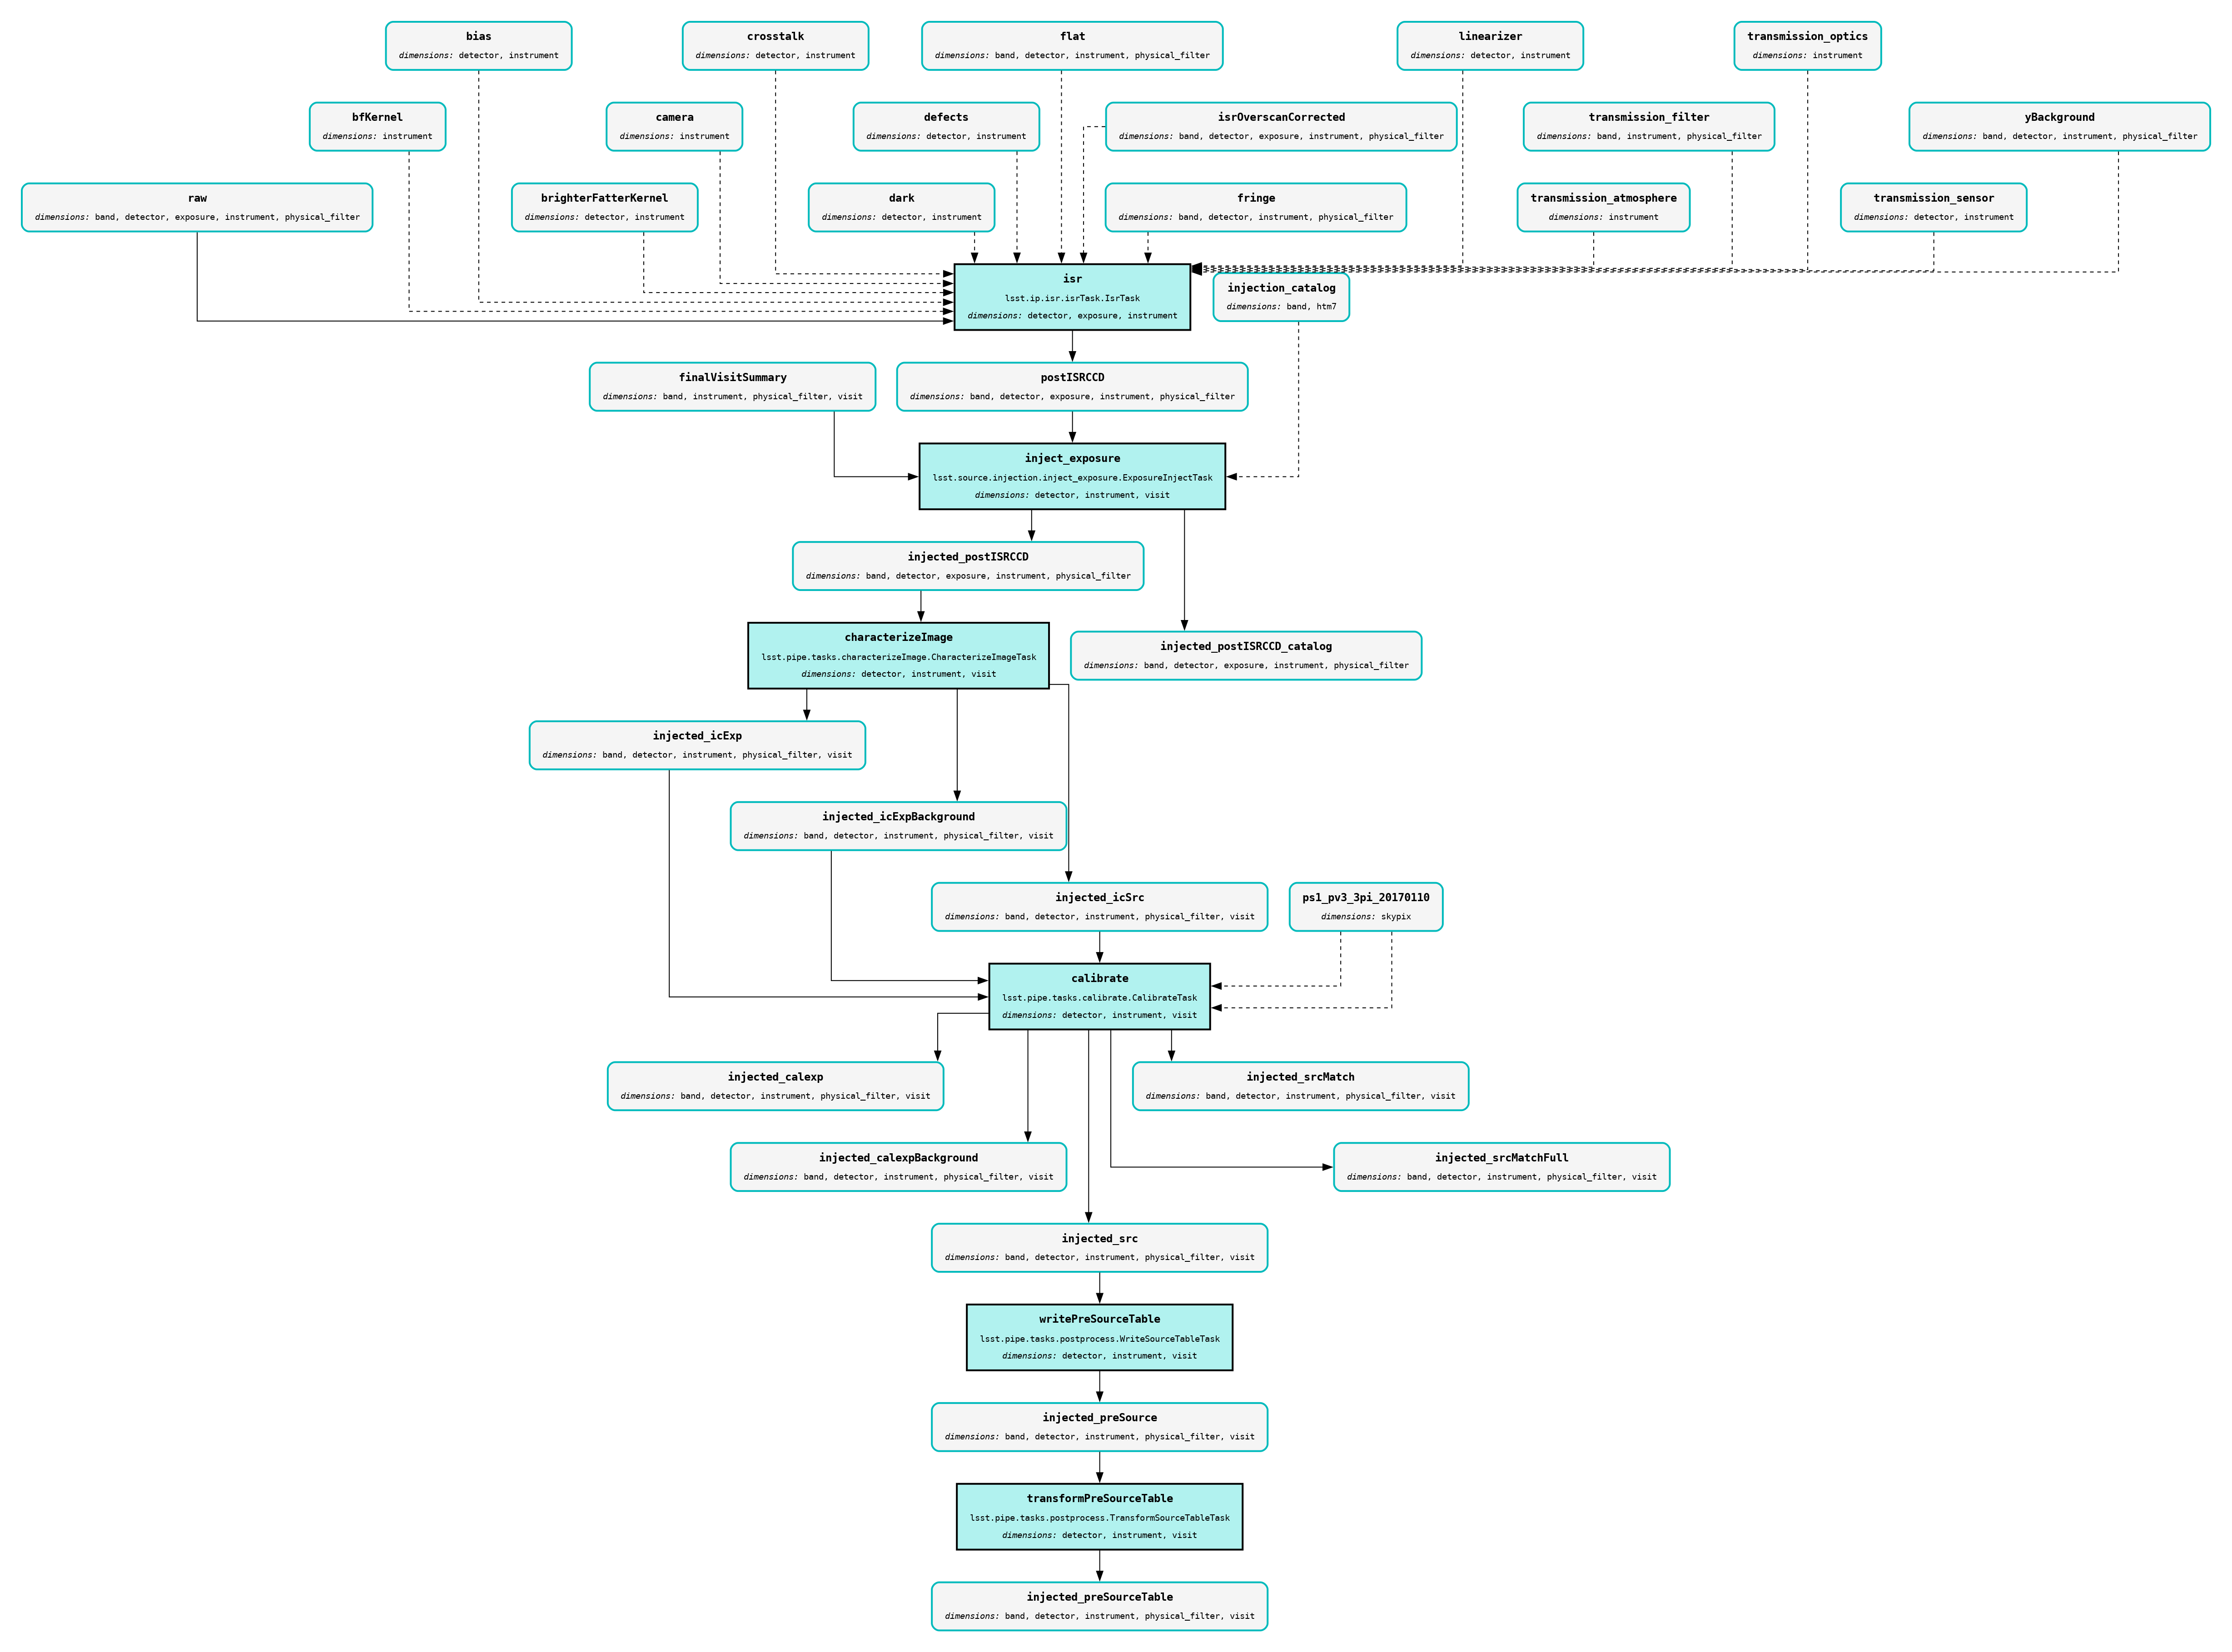
|
|
|
The |
The |
The |
Wrap Up
This reference page has described how to make a fully qualified source injection pipeline definition YAML file, either on the command line or in Python. Options for visualizing the resultant pipeline have also been presented.
Move on to another quick reference guide, consult the FAQs, or head back to the main page.